watchOS 2: Communicating With a Counterpart

Artigo

Jorge Frazão explica como comunicar de forma confiável entre um watchOS e iOS app, e vice-versa.

Ever since the release of Apple Watch, developers have been debating and presenting techniques to overcome the limitations of watchOS 1. Developers have wondered, for example, how to reliably communicate between a watchOS app and its parent iOS app, and vice versa.

A number of solutions have been available to solve this problem, such as MMWormhole. Of course, Apple has been well aware of the limitations of watchOS 1 and the release of watchOS 2 resolves a number of the limitations of watchOS 1. Communicating between a watchOS 2 app and its parent iOS app, for example, has become much simpler thanks to the introduction of the Watch Connectivity framework.

Watch Connectivity

The Watch Connectivity framework provides several ways to communicate between an iOS and a watchOS 2 app. With the Watch Connectivity framework, you can update information on a counterpart, send messages, transfer data in the background, and even transfer files. To learn more about all the framework’s features and capabilities, I recommend browsing Apple’s documentation for the Watch Connectivity framework.

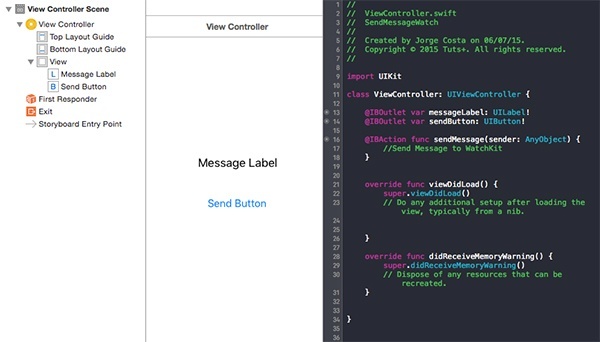
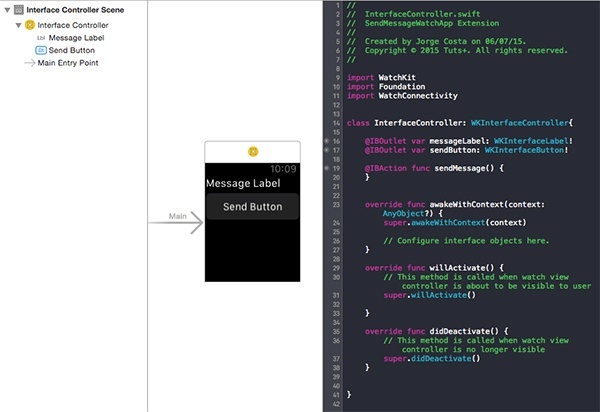
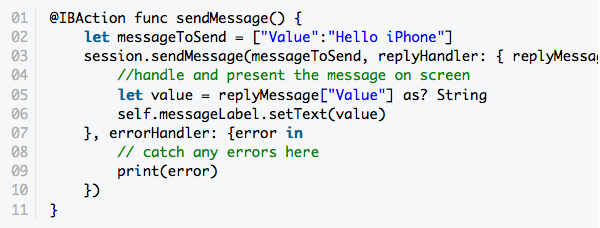
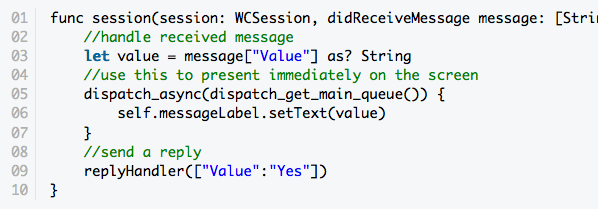
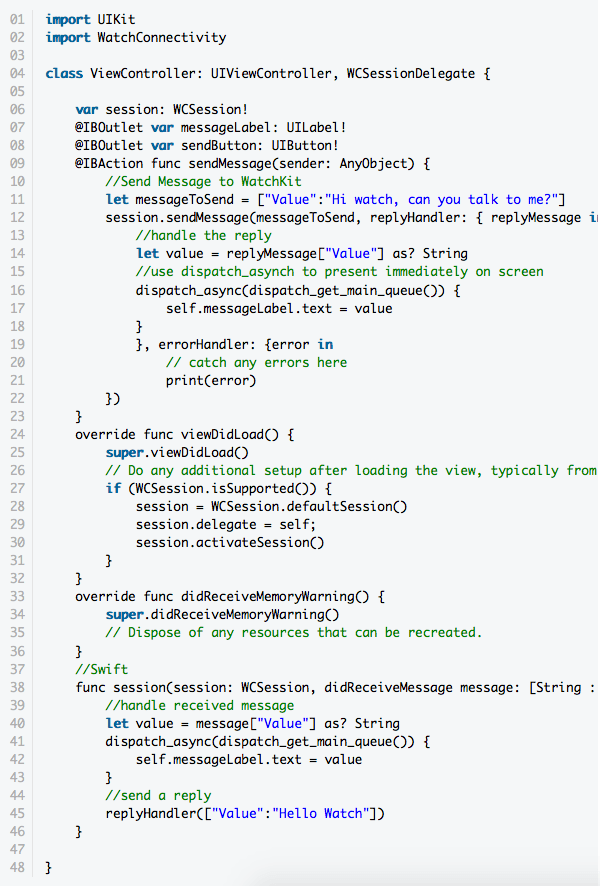
In this tutorial, I will show you how to exchange data between a watchOS 2 app and its parent iOS app, and vice versa. The API we’ll use to accomplish this is sendMessage(_:replyHandler:errorHandler:). This method lets developers transfer data between the watchOS 2 app and its parent iOS app.

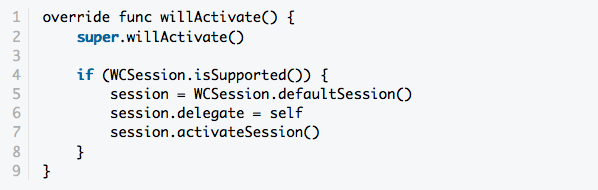
It’s important to note that the iOS and the watchOS 2 app respond differently when sendMessage(_:replyHandler:errorHandler:) is invoked. If this method is invoked by the watchOS 2 app, the iOS app will be woken up by the operating system. If you send data from the parent iOS app to the watchOS 2 app, however, the latter will not wake up. This is an important detail to keep in mind.

Prerequisites

Since this tutorial is about Apple Watch development, I assume that you’re already familiar with iOS development and the Swift programming language. The Watch Connectivity framework is only available on watchOS 2, which means that you need to have the latest version of Xcode installed, Xcode 7. You can download Xcode from Apple’s developer website.
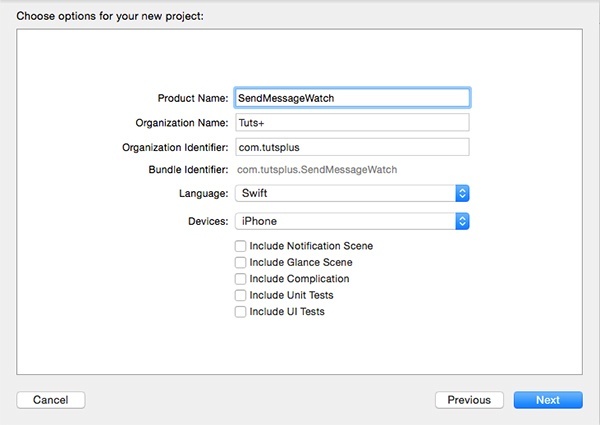
1. Project Setup

Open Xcode and select New > Project… from the File menu. Go to watchOS > Application, select the iOS App with WatchKit App project template and click Next. Name your app SendMessageWatch, set Language to Swift, and Devices to iPhone. Uncheck Include Notification Scene and make sure that every checkbox at the bottom is unchecked. Hit Next and choose a location to save your project.

2. Creating the User Interface
In this step, we’ll add a label and a button to both apps. The label will be used to display the messages we’re sending while the button will send the message to the counterpart, the iOS app or the watchOS 2 app.

We’ll start with the iOS app. Open Main.storyboard and add a label and a button. Next, create an outlet for both user interface elements, and add an action for the button. The below screenshot shows the result.

Let’s now focus on the watchOS 2 app. Open Interface.storyboard and add a label and a button to the scene. Next, open InterfaceController.swift in the Assistant Editor and create an outlet for the label and the button, and add an action for the button.

With the user interface in place, it’s time to zoom in on the main topic of this tutorial, sending messages from the iOS app to the watchOS 2 app, and vice versa.

3. Using the Watch Connectivity Framework

Using the Watch Connectivity framework to exchange messages requires the use of the WCSession class. For this to work, both the iOS app and the watchOS 2 app must create and configure a WCSession instance. When the session is configured, we can communicate immediately back and forth.

We obtain an instance of the WCSession class by calling the defaultSession class method. This returns the singleton session object for the device. We then need to set the session’s delegate and activate the session.

Before we configure and use the WCSession object, we need to verify that the WCSession class is supported on the device. We do this by calling the isSupported class method on the WCSession class. We do all this in the willActivate method of the InterfaceController class. Note that activateSession will throw an exception if the session’s delegate is nil. In other words, the order of the below statements is important.

The watchOS 2 app is now able to send and receive messages. With the session activated, we just need to invoke the sendMessage(_:replyHandler:errorHandler:) method to send messages. The first argument needs to be a dictionary of type [String : AnyObject] and it should not be nil.

The replyHandler is a closure that accepts a dictionary of the same type. This dictionary is the response from the counterpart. The errorHandler is also a closure, which can be nil if you don’t need to catch any errors.

If we hit the send button on the Apple Watch, it will immediately send a Hello iPhone message and the iPhone will reply with a Hello Watch message. After hitting the send button on the iPhone, it will send a question Hi watch, can you talk to me? and the Apple Watch will answer with Yes.

This is what the implementation of the sendMessage method should look like in InterfaceController.swift.

To handle the message on the iOS device, we need to implement the session(_:didReceiveMessage:) delegate method of the WCSessionDelegate protocol, which is invoked when a message is received by the counterpart. This is what the implementation looks like in InterfaceController.swift.

The implementation of both methods looks very similar for the iOS app. With the above implementations, give it a try by implementing the sendMessage and session(_:didReceiveMessage:replyHandler:) methods. This is what the implementation of the ViewController class should look like.

Build and run the apps to see the final result. When you tap the button on Apple Watch, a message should appear on the paired iPhone running the iOS app. When you tap the button of the iOS app, a message should appear on Apple Watch running the watchOS 2 app.

4. Exploring the WCSessionDelegate Protocol

The delegate method we implemented to receive the message has a simpler sibling, session(_:didReceiveMessage:). This method is called when sendMessage(_:replyHandler:errorHandler:) is invoked without a reply handler. This simply indicates that the app sending the message doesn’t expect a response.

In addition to sending a dictionary to a counterpart, it’s also possible to send a NSData object using the sendMessageData(_:replyHandler:errorHandler:) method. The counterpart receives the message through the session(_:didReceiveMessageData:) and session(_:didReceiveMessageData:replyHandler:) delegate methods of the WCSessionDelegate protocol.

Conclusion

If you need to communicate immediately with a counterpart, then the Watch Connectivity framework is the best choice on watchOS 2. The messages are queued and delivered in the same order that they were sent in.

The Watch Connectivity framework has a lot more to offer than what is covered in this tutorial. In future tutorials, we will dive deeper into this new framework to further explore its features and capabilities.

Jorge Frazão – Founder and iOS & Web Development Manager / iOS Writer

Curso Intensivo iOS Mobile Development Porto

Workshop Mobile Development Swift 2.0 Language


Partilhar:

    Fale connosco

    Interesses

      Subscrever Newsletter

      Interesses